
An affiliate marketing website is the one asset you fully own. Social accounts can disappear overnight, but your site stays yours, ranks in search over time, and can send you visitors and commissions long after you publish.
The good news: you don’t need to code or have a big budget. This guide walks you through every step, from picking a niche to publishing your first post, and you can follow the 7-day action plan at the end to get it done in one week.
Who this is for: complete beginners who want a real website, not just social media posts.
What you’ll have by the end: a live WordPress site with the essential pages, your first affiliate links in place, and a plan for your first post.
Your 7-Step Action Plan
Follow this checklist to go from zero to a live affiliate website in one week. If it takes you longer, that’s fine. Progress counts more than speed.
- Step 1: Pick your niche. Choose a topic you can write about for a long time, then use the Affiliate Commission Calculator to sanity-check what you could earn.
- Step 2: Get your domain and hosting. Brainstorm names with the Domain Name Generator, then register your domain and sign up for hosting.
- Step 3: Set up WordPress. Install WordPress, pick a lightweight theme, and add only the essential plugins.
- Step 4: Create your key pages. Publish your Homepage, About, Contact, Privacy Policy, and Terms of Service. Use the Affiliate Disclosure Generator for your disclosure.
- Step 5: Join affiliate programs. Apply to two or three programs in your niche, then install Pretty Links and cloak your first affiliate link.
- Step 6: Write your first post. Find a topic with the Long-Tail Keyword Generator and write a helpful review or how-to. Test your title with the Free Headline Analyzer.
- Step 7: Start your email list. Add a signup form with your free guide, publish your post, and share it.
Step 1: Choose Your Niche
Your niche is the focused topic your website is about. A clear niche tells visitors (and Google) who your site is for, which makes it easier to rank, build trust, and earn commissions. A site about “everything” speaks to no one.
Already have a niche? Skip ahead to Step 2.
The 3-Question Niche Test
Your best niche sits where these three things overlap:
- Can you stay interested in it? You’ll write about this topic for months, so pick something you enjoy learning or already know.
- Do people spend money on it? Look for products or services with affiliate programs. Check each program’s commission rate and cookie length on its own website before you commit.
- Is there room for you? Strong demand is good. A topic where only huge brands rank is not. A narrower focus gives a newer site a better chance.
If you can answer yes to all three, you have a workable niche.
Niche Down to Stand Out
Broad niches are crowded. Narrow yours until it describes a specific person with a specific problem.
- Fitness → fitness for men over 40, home workout equipment
- Technology → AI tools for small business owners
- Personal development → productivity for busy parents, Offer coaching services, sell eBooks, workshops and so on.
- Online business → email marketing for beginners, ecommerce for beginners
You can always expand later. It’s much harder to start wide and become known for something.
Know Who You’re Writing For
Once you have a niche, picture one reader and write for them. Ask:
- Who are they, and where are they right now (beginner, switching careers, side hustler)?
- What are they struggling with?
- What have they already tried?
- What would make them say “this finally helped”?
To find real answers, read questions in Reddit threads, Facebook groups, and the “People also ask” box on Google. The exact words people use become your future post titles.
Quick Validation (15 Minutes)
Before you buy a domain, check that your niche has legs:
- Estimate the money. Plug a typical commission into the Affiliate Commission Calculator to see what a few sales a month could look like.
- Find content ideas. Enter your topic into this Long-Tail Keyword finder. If you can list 20 or more specific post ideas, the niche has enough to write about.
- Check for affiliate programs. Search “[your niche] affiliate program” and confirm there are at least three or four you’d be proud to recommend.
If all three checks pass, move on. Don’t wait for the perfect niche, because you’ll learn more by publishing than by researching.
Ready for the next step? Let’s get your domain and hosting set up. [Go to Step 2 ↓]
Step 2: Get Your Domain Name and Hosting
Your website needs two things: a domain name (its address, like tajedo.com) and hosting (the service that keeps your site online). You’ll set up both in about 20 minutes.
Pick Your Domain Name
Your domain is how people find and remember you, so choose it carefully. Use these rules:
- Keep it short and easy to say. If you’d have to spell it out over the phone, try again.
- Avoid numbers and hyphens. They cause typing mistakes.
- Go for .com if you can. It’s the most trusted and easiest to remember.
- Don’t put another company’s brand name in it. Many affiliate programs ban this, and it can cause trouble later.
- Think brandable, not just keyword-stuffed. A name you can grow with beats one that traps you in a tiny topic.
- You can even use your own name.
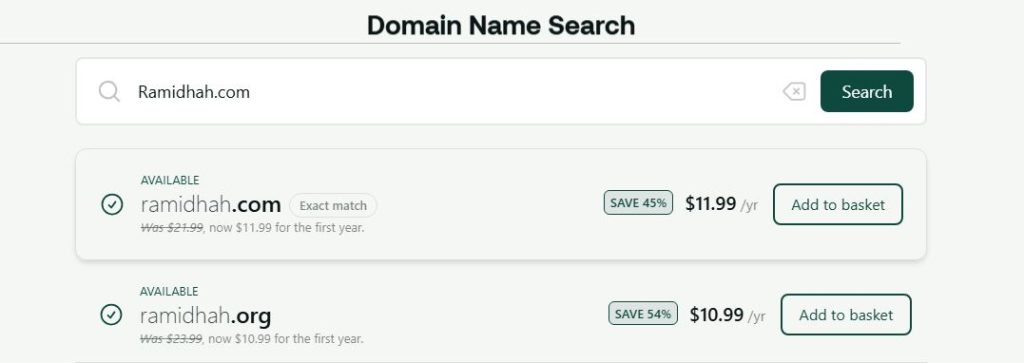
Hosting.com has a feature that enable you to search your domain name search availability. check below 👇
Choose Your Hosting
Your host stores your site and keeps it fast and secure. For a WordPress site, look for:
- One-click WordPress install
- A free SSL certificate (the padlock that makes your site load with https)
- 24/7 support you can reach if you get stuck
- Easy upgrades when your traffic grows
- A clear refund policy (check the current terms before you buy)
My pick for beginners: Hosting.com. It’s built for WordPress, and it’s what I use for Tajedo.com. The basic plan is better for beginners to start.
Get Started with Hosting.com →
Set Up Your Domain and Hosting
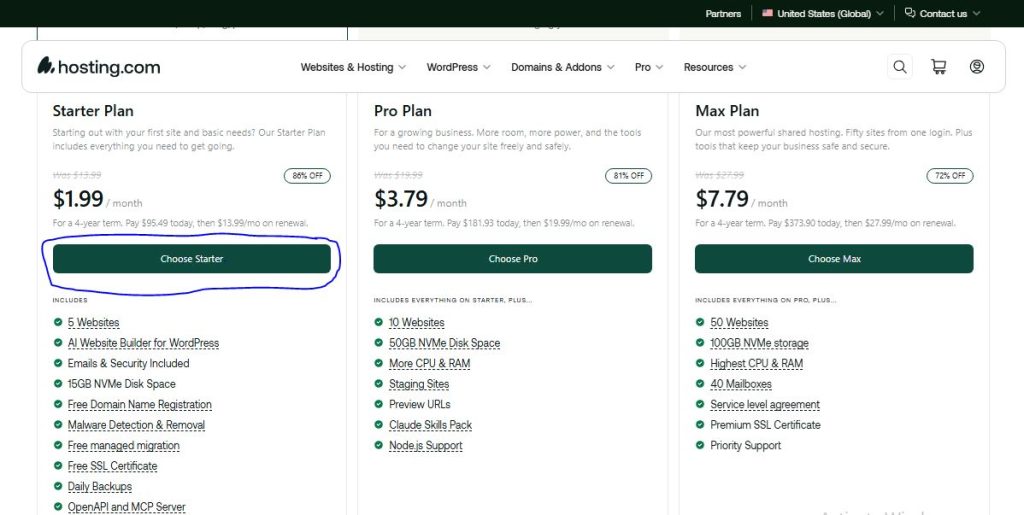
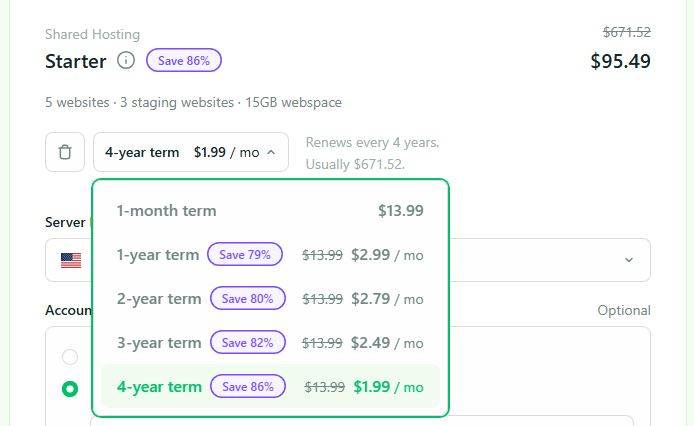
- Go to Hosting.com and choose a WordPress hosting plan. Choose the Starter plan as shown below.
2. Scroll below the checkout page, look for “Account Domain Name” Enter the domain name you picked, or register a new one.
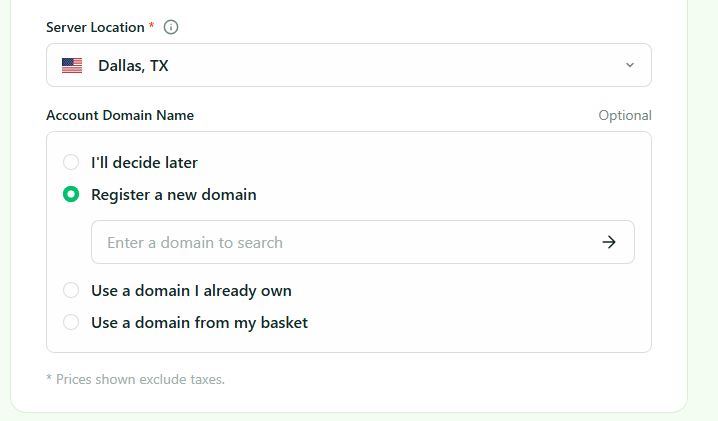
3. Create your account and choose how long to pay for. (This is slightly located above the Account domain Name). Longer terms usually cost less per month. By default it’s normally 4-years and I recommend that as it allow you to grow your business over time.
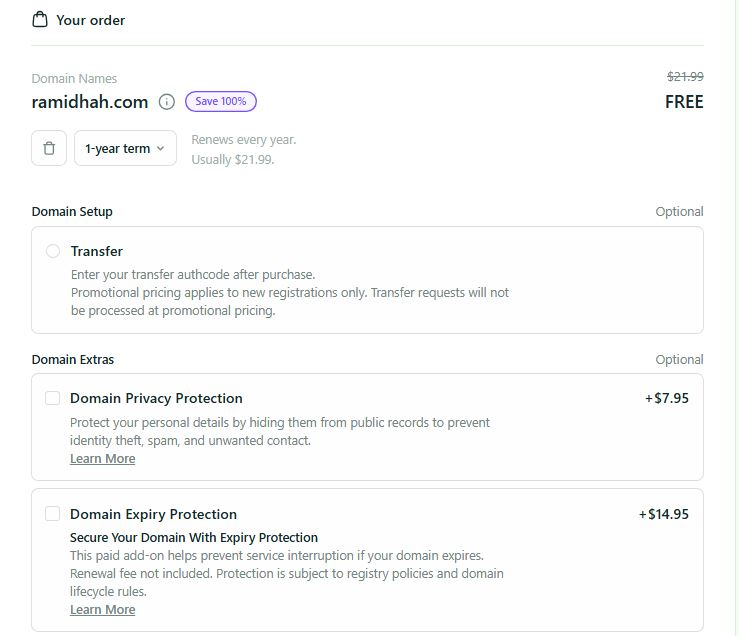
4. Review the add-ons at checkout and skip anything you don’t need yet. Ignore the optional choices (Domain Extras & Domain Setup) you don’t need them.
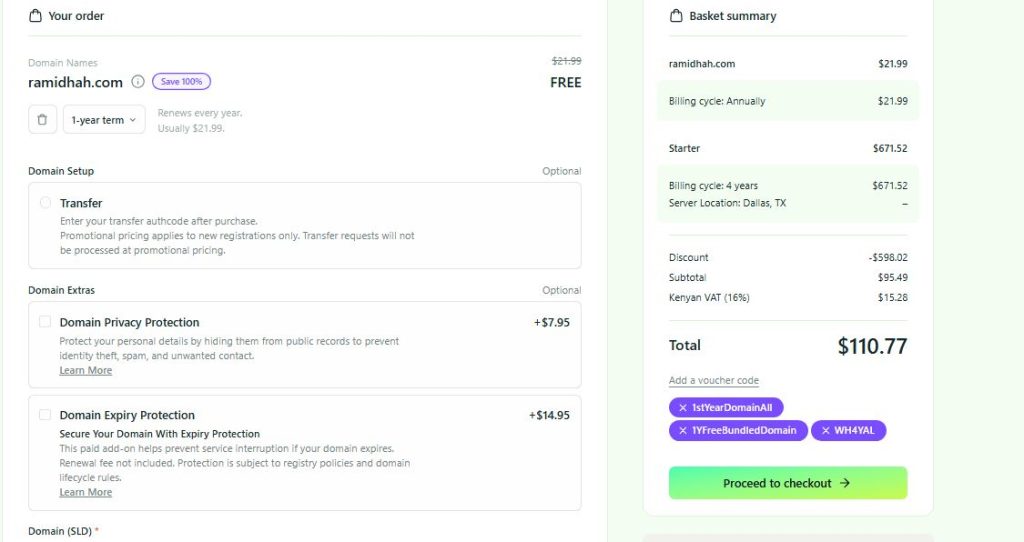
5. Click Proceed to Checkout. To complete your payment. Remember to save your password.
6. A welcome email with your login details will arrive.
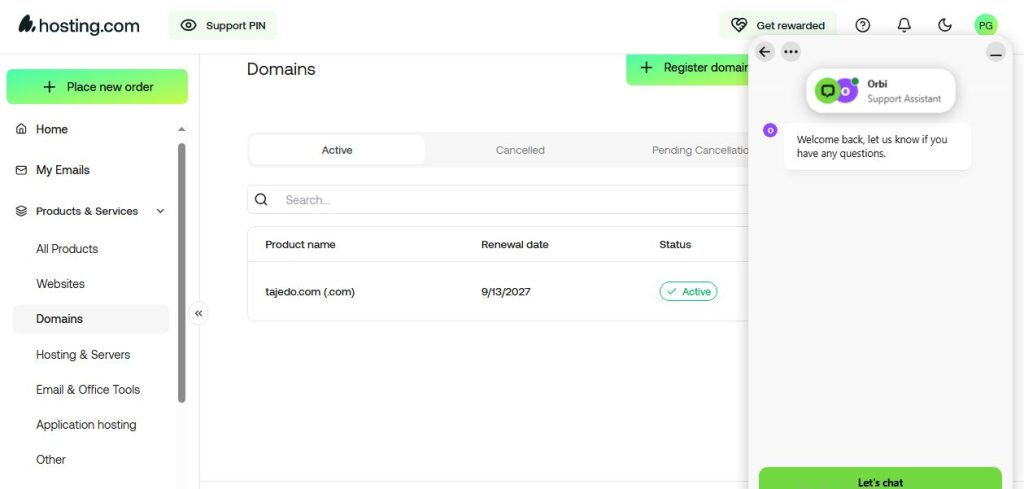
7. Log in to your hosting dashboard and install WordPress with the one-click installer. If you get stuck, you can ask support to do it for you.
8. Make sure SSL is turned on so your site loads with https.
9. Log in to WordPress at yourdomain.com/wp-admin.
Pro tip: Save your hosting and WordPress logins in a password manager right away.
Prefer Bluehost?
Bluehost is another beginner-friendly option.
“Using Bluehost instead?”
Set up the domain name and web hosting plan
1. Click here to go to Bluehost
Once on the page, click on the “Get Started” button

2. Select the plan you want to use for your blog, based on your budget. We highly recommend you to select the Basic plan.

3. Enter the domain name you want to use (e.g., tajedo.com)

4. Enter your account information

5. Under the package Information, choose an account plan based on how long you want to pay. Choose Basic plan 12/36 months. Remember there’s a 30 day money back guarantee with all plans, so no risk at all)

6. Uncheck the Extra package (you don’t really need them)
7. Enter your payment information to complete your purchase.
Once done here, a welcome email will be sent to your email inbox. Set your password and login to your Bluehost account.

8. Skip the on-boarding questions, but choose a blog when prompted.
9. Click “Skip this Step” when it comes to choosing your theme (We shall get that done later in this guide)
Get Started with Bluehost here
Installing WordPress
From the Bluehost dashboard, click the “Start Building” button to install WordPress.
Bluehost is a self hosted WordPress blog platform. It automatically installs WordPress in one click right from your hosting dashboard.
Steps to install WordPress:
1. Sign in to your hosting account.
2. Locate the WordPress installer and follow the prompts.
3. Log in to your WordPress dashboard to start building your site.
Pro Tip: You can ask the Tech Support to install it for you, if you have trouble installing it yourself.
Your site is live. Next, let’s make it look professional. [Go to Step 3 ↓]
Step 3: Set Up Your Theme, Pages, and Plugins
Your site is live but empty. In the next hour or so, you’ll make it look professional and add the pages and tools every affiliate site needs.
Pick a Theme
A theme controls how your site looks. For an affiliate site, you want one that is fast, clean, and works well on phones, since most visitors will arrive on mobile.
- GeneratePress: Lightweight and very customizable. It’s what Tajedo.com is built with.
- Astra: Fast and beginner-friendly, with ready-made starter templates.
Either works. Pick one and move on, because you can change it later.
To install a theme: In WordPress, go to Appearance > Themes > Add New, search for the theme, then click Install and Activate. The free version of either is plenty to start.
Create Your Essential Pages
Every affiliate site needs these pages before you publish content:
- Homepage: Say who your site is for and what they’ll find. Link to your best content.
- About: Tell your story and why readers should trust you. This is one of the most-visited pages on any site.
- Contact: Give people a simple way to reach you.
- Blog: Where your posts will live.
- Privacy Policy: Required by most affiliate programs, ad networks, and email tools.
- Terms of Service: Sets the rules for using your site.
- Affiliate Disclosure: Tells readers you may earn a commission from links. Use the Affiliate Disclosure Generator to create one in a minute. [Link to tajedo.com/affiliate-disclosure-generator/]
To create a page: Go to Pages > Add New, write your content, and click Publish. Then add the key pages to your menu under Appearance > Menus.
Install Only the Plugins You Need
Plugins add features to WordPress, but each one can slow your site down. Start with these four:
- Yoast SEO: Helps with your sitemap, page titles, and meta descriptions.
- A form plugin (like WPForms): Adds your contact form and email signup forms.
- UpdraftPlus: Backs up your site so you can restore it if something breaks.
- Pretty Links: Cloaks and shortens your affiliate links and tracks their clicks.
To install a plugin: Go to Plugins > Add New, search for it, click Install Now, then Activate.
Add later, once you have traffic: A security plugin like Wordfence, a speed plugin like WP Rocket, and Google Analytics tracking with a plugin like MonsterInsights.
Make It Yours
Spend a few minutes on the finishing touches:
- Add your logo, or just a clean text title.
- Keep the menu simple: Home, Blog, About, Contact.
- Pick one or two colors and stick with them.
- Preview your site on your phone before moving on.
Your site is built. Next, let’s get your first content and affiliate links in place. [Go to Step 4 ↓]
Step 4: Create Your First Content and Add Affiliate Links
Content is what brings visitors to your site and what makes them trust you enough to click. You don’t need dozens of posts to start. You need one good one.
Join Affiliate Programs First
Before you write, sign up for two or three affiliate programs in your niche. That way you know which products you can recommend, and you can add your links as you write.
- Search “[your niche] affiliate program,” or check the product’s website for an “Affiliate” or “Partners” link in the footer.
- Check the commission, cookie length, and payout terms on each program’s own page.
- Only join programs for products you’d happily recommend to a friend.
Once approved, you’ll get a unique link for each product.
Pick Your First Post Type
For your first posts, choose formats that match what buyers search for:
- Product reviews: An honest look at a tool, with pros, cons, and who it’s best for.
- How-to guides: Step-by-step help that naturally points to a tool.
- Comparisons (“X vs Y”): Help readers choose between two options. These often convert well.
- Best-of lists: “Best [tools] for [audience],” with a short take on each.
A good first post is a review or how-to of a product you’ve actually used.
Find Your Keyword with KWFinder
Writing without keyword research is guessing. A keyword is the phrase people type into Google, and your job is to find ones you can realistically rank for.
Mangools (KWFinder) makes this easy for beginners:
- Enter your topic and see related keyword ideas.
- Check each keyword’s search volume and difficulty score.
- Pick a specific, lower-competition phrase over a broad one. “Best email marketing tool for beginners” beats “email marketing.”
- Look at what’s already ranking to see what readers expect.
You can also brainstorm free ideas with the Long-Tail Keyword Generator first, then check the best ones in KWFinder. [Link to tajedo.com/long-tail-keyword-generator/]
Write Your Post Faster with KoalaWriter
A full article can take hours when you start from a blank page. KoalaWriter can generate an SEO-optimized draft from your keyword in minutes, so you spend your time improving it instead of starting from scratch.
Get 15% off your first purchase with promo code TAJEDO44.
Whatever tool you use, treat the draft as a starting point. Before you publish:
- Add your own experience, opinions, and examples.
- Check every fact, feature, and price against the product’s official site.
- Rewrite anything that sounds generic so it sounds like you.
- Add screenshots if you have them.
Readers and Google both reward content that feels real and helpful.
Structure Your Post to Convert
A simple layout that works for most affiliate posts:
- A short intro that names the problem and promises the answer.
- A quick summary or “best for” verdict near the top.
- The details: features, pros, cons, and who it fits.
- Your honest recommendation.
- A clear button or link to try the product.
Test your headline with the Free Headline Analyzer before you publish.
Add Affiliate Links the Right Way
- Link where it helps. Put links where a reader would naturally want to try or learn more, like in your recommendation and your buttons.
- Don’t overdo it. A few well-placed links beat a page full of them.
- Cloak your links with Pretty Links. You’ll have clean links like yourdomain.com/toolname that are easier to trust and update.
- Always disclose. Place a short disclosure near the top of every post that has affiliate links, such as: “This post contains affiliate links. If you buy through them, I may earn a commission at no extra cost to you.”
Double-Check and Publish
Before you hit Publish, check these:
- The keyword is in your title, URL, and first paragraph.
- Your affiliate links work and open the right page.
- Your disclosure is visible.
- The post looks good on your phone.
Then publish, and move on to your next post. Consistency matters more than perfection.
Your first post is live. Next, let’s get visitors to it. [Go to Step 5 ↓]
Step 5: Get Visitors to Your Website
A new site starts with zero traffic, and that’s normal. The goal now is to get your content in front of the right people. Focus on one or two channels at first instead of trying everything.
Get Found in Search (SEO)
Search is the best long-term traffic source for an affiliate site, because people searching for a product are often ready to buy. It’s slower at first, but it keeps working after you publish.
- Submit your sitemap. Add your site to Google Search Console and Bing Webmaster Tools, then submit your sitemap URL (with Yoast it’s usually yourdomain.com/sitemap_index.xml). This helps search engines find your pages faster.
- Target one keyword per post. Use KWFinder to pick specific phrases you can realistically rank for.
- Optimize each post. Put your keyword in the title, URL, first paragraph, and a few headings. Tools like RankIQ and Frase can show you what top-ranking pages cover, so you can fill the gaps in your own post.
- Link your posts together. Add internal links between related articles so readers (and Google) can move through your site.
- Be patient. New sites often take months to see real search traffic. Keep publishing helpful posts while you wait.
Build Your Email List from Day One
Search traffic can rise and fall, but your email list is yours. Every visitor who joins is someone you can reach again.
- Offer a free resource, like a checklist or guide, in exchange for an email address.
- Add signup forms at the end of every post and on your key pages.
- Send helpful tips regularly, with the occasional honest recommendation.
Systeme is a good place to start, since it has a free plan and handles forms, emails, and automations in one tool.
Share Your Content on Social Media
Social media won’t replace SEO, but it can bring your first visitors while search catches up.
- Pick one or two platforms where your audience actually spends time, and go deep instead of wide.
- Share useful snippets, like a tip or a quick lesson from your post, with a link to read more.
- Join niche communities and answer questions. Share your link only when it truly helps, and follow each group’s rules.
- Repurpose your posts into short videos, carousels, or threads.
Track What’s Working
If you don’t track your links, you won’t know which channels pay off.
- Use the UTM Link Builder to tag your links by source, such as email, Facebook, or Pinterest. [Link to tajedo.com/utm-link-builder/]
- Use Pretty Links to see how many clicks each affiliate link gets.
- Check Google Analytics or Search Console weekly to see which posts bring visitors.
Double down on what works, and drop what doesn’t.
Paid Ads (Optional, Later)
Paid ads can speed things up, but they cost real money and can lose it quickly if you’re not careful. I only recommend using paid Ads like FB Ads to grow your email list. Don’t start here.
If you decide to try them later:
- Wait until you have a post or offer that already converts well organically.
- Start with a small test budget you can afford to lose.
- Track every click, lead, and sale by source. A tracker like ClickMagick shows what each traffic source earns, so you know where to scale and what to stop.
- Read the ad platform’s rules on affiliate promotions before you spend anything.
Visitors are coming. Next, let’s track your results and improve over time. [Go to Step 6 ↓]
If you have not started your website: Get started with Hosting.com here→
Step 6: Track Your Results and Improve Over Time
Publishing is only half the job. Once you have visitors, the data shows you what’s working, so you can do more of it and fix what isn’t. You don’t need to check ten dashboards. Start with a few.
The Four Numbers That Matter
- Visitors: How many people reach your site, and from where (search, social, email).
- Top pages: Which posts get the most visits.
- Link clicks: How many people click your affiliate links.
- Commissions: What those clicks turn into, which you’ll find in each affiliate program’s dashboard.
Everything else is extra until these four are moving.
Set Up Your Tracking Tools
- Google Analytics: Shows visitors, traffic sources, and which pages people read and how engaged they are. Connect it with a plugin like MonsterInsights, or add the code through your theme.
- Google Search Console: Shows the searches that bring people to your site, your impressions, and your average ranking. It’s free and the best place to find new content ideas.
- Pretty Links: Shows how many clicks each affiliate link gets, so you can see which recommendations your readers care about.
- UTM Link Builder: Tags the links you share in emails and on social media, so you know which channel sent each visitor.
- Affiliate dashboards: Each program shows clicks, sales, and earnings. Check them for the numbers that actually pay you.
If you start running paid traffic later, a tracker like ClickMagick shows the leads, sales, and revenue from each source, so you can see where to scale and what to stop.
Your 15-Minute Weekly Check-In
Pick one day a week and go through this list:
- Open Search Console. Which queries and pages gained impressions or clicks?
- Open Google Analytics. Which posts and traffic sources are growing?
- Check Pretty Links. Which affiliate links got the most clicks?
- Check your affiliate dashboards. Did any clicks turn into sales?
- Write down one thing to try next week.
Keeping a short log of what you changed and what happened will teach you faster than any guide.
Improve What You’ve Already Published
Updating a post that’s already getting impressions is often faster than writing a new one.
- Rewrite posts that get impressions but few clicks. In Search Console, look for pages that show up in search but don’t get visits, and improve their titles and meta descriptions. The Free Headline Analyzer can help you test new titles.
- Strengthen posts that rank on page two. Add missing sections, examples, and internal links. Frase and RankIQ can show you what top-ranking pages cover that yours doesn’t.
- Move your best links higher. If readers click a recommendation, make it easier to find with a clear button near the top.
- Test one change at a time. Try a new button label, a different position, or a clearer headline, then compare results over a few weeks.
- Refresh old posts. Check that tools, features, screenshots, and links are still accurate, and update the date when you’ve made real changes.
- Write more of what works. If one comparison post performs well, write another in the same style.
Know When to Be Patient
Most new sites take months to see steady traffic, and commissions usually come after that. Don’t judge your site after two weeks. Judge it by whether your numbers move in the right direction month over month.
You now have everything you need to build and grow your site. Before you start, avoid these common mistakes. [Go to Common Mistakes ↓]
Common Mistakes to Avoid
Most beginners trip over the same few things. Avoid these and you’re already ahead.
1. Picking a niche that’s too broad
A broad topic is crowded and hard to stand out in. Fix: Narrow it to a specific audience and problem, like “fitness for men over 40” instead of “fitness.” (See Step 1.)
2. Stuffing posts with affiliate links
Too many links makes your site feel spammy and hurts trust. Fix: Link only where it genuinely helps the reader, and put your best recommendation where it’s easy to find.
3. Skipping keyword research and quality
Posts written without keyword research or real value rarely rank. Fix: Find your keyword with KWFinder first, then add your own experience, examples, and fact-checks to every post. (See Step 4.)
4. Waiting to build an email list
Many beginners add a signup form months too late, and every visitor who leaves is lost. Fix: Offer a free resource and add a form from your first post. (See Step 5.)
5. Ignoring disclosure and legal pages
Affiliate programs and the law expect you to be upfront. Fix: Add a clear disclosure to every post with affiliate links, and publish your Privacy Policy, Terms, and Affiliate Disclosure pages. (See Step 3.)
6. Giving up too early
Most new sites take months to see steady traffic. Fix: Judge your progress by whether your numbers grow month over month, not week to week. (See Step 6.)
Other ways to Monetize your affiliate marketing website.
Apart from affiliate marketing commissions, there are other ways you can make money with your affiliate marketing website. This monetization methods include:
- Selling Digital products e.g., eBooks and templates.
- Online Courses
- Sponsored posts
- Selling ad spaces
- Membership content
- Coaching & Consulting services
- Offer Freelance writing services
- Virtual Assistant.
Want more? Check our Affiliate Marketing alternatives post here.
Conclusion
Building an affiliate marketing website comes down to a handful of steps: choose a focused niche, set up your domain and hosting, install a clean theme with the essential pages, publish helpful content, bring in visitors, and track what works.
You don’t need to do it all at once, and you don’t need to do it perfectly. The sites that grow are the ones that keep publishing and improving, one post at a time.
Here’s what to do next:
- Start your 7-day plan today. Even finishing Day 1 puts you ahead of most people who only read about it.
- Get your domain and hosting set up. Get started with Hosting.com →
- Grab the free Tool Stack guide for the tools I’d start with at every step. [Download it here →]
This post contains affiliate links. If you buy through them, I may earn a commission at no extra cost to you.